Saturday, April 10, 2010
Installing Microsoft Loopback Adaptor
Friday, April 9, 2010
Installing Oracle E-Business Suite R12 on Microsoft Windows Server 2003
- Windows Server 2003
- Perl (Active Perl)
- Microsoft Visual C++ (Can find from Visual Studio 2008)
- MKS Toolkit or Cygwin (Note:414992.1 fro Cygwin).
- Jdk (Java development Kit) Click here to download
- Oracle R12 E-Business Installer
- Hardware1 CPU, 2.00 Ghz, with 2 GB of RAM. Oracle E-business suite with Vision data takes 247.38 GB on disk. Its recommend more disk space should be available if want development tools on the same computer. 45 GB for database, 28 GB for Application Tier without the Vision Database.
- Right click on 'My Computer' > Properties > 'Computer Name' > Change
- Set 'Computer Name' to “oracleebs” without “
- Click on More Set a Primary DNS Suffix of this Computer to “company.com”
Example: 192.168.1.29 oracleebs.company.com oracleebs
5) Enable navigation by installing loopback adaptor (click her)
6) Download Active Perl Windows Installer (MSI) AS Package (ZIP) and run installer.
7) Install Microsoft Visual C++ 2008
Download and start setup for visual studio 2005
Select custom installation
Set product install path to c:\mvsc\
Select C++ and NET Framework SDK only
Right click on 'My Computer' > Properties > Advance > Environment Variables > scroll down system variables list > Select Path > Edit > add C:\msv\VC\bin
8) Install Cygwin
You nee to install MKS Tool Kit or cygwin. We go with cygwin its free download on local disk and start cygwin installer (setup.exe ). If we select cygwin then we do not need gnumake or make with cygwin
Start the setup
Select Download without Installing and click Next
Set path where you want to save and click Next
Select Internet Connction type
Choose A Download Site i.e http://mirror.calvin.edu/ or select another from list and clink Next
Select all default and following mandatory packages:
Base: all default + ash, coreutils, diffutils, findutils, gawk, grep, sed, tar and which
Devel: all default + binutils, gcc, gcc-core, gcc-g++, make and mktemp
Doc: all default + cygwin-doc and man
Editors: all defaults + vim
Interpreters: all default + gawk
Shells: all default + ash and tcsh
Utils: all default + cygutils and file
Select install from local directory > click Next > Set root path c:\cygwing and click Next Select local package directory (where you download cygwin packages) click Next > Now installer will start click Finish when completed.
Add C:\cygwing\bin directory to path variable - C:\> set path=%path%; C:\cygwing\bin
copy gawk.exe awk.exe (delete existing awk.exe before copying can user xcopy)
copy grep.exe egrep.exe
copy make.exe gnumake.exe
copy gcc.exe cc.exe (delete existing cc.exe before copying)
9) Download and Install JDK (Java development Kit)
10) Login at http://edelivery.oracle.com/ > Continue > Select a Product Pack & Platform > Go > Oracle E-Business Suite Release 12.1.1 Media Pack for Microsoft Windows (32-bit) Download following:
Microsoft Windows (32-bit) Rapid Install Start Here (Part 1,2,3,4)
Microsoft Windows (32-bit) Rapid Install RDBMS - Disk 1,2
Microsoft Windows (32-bit) Rapid Install Databases - Disk 1,2,3,4,5,6,7
Microsoft Windows (32-bit) Rapid Install Tools - Disk 1
Microsoft Windows (32-bit) Rapid Install APPL_TOP - Disk 1,2
After downloading create directory StagesR12 and unzip files showing as:

Start the installation
D:\> StageR12\startCD\Disk1\rapidwiz> RapidWiz.cmd
The rapid installation wizard will start, now follow installation wizrad


- Click the "Next" button when appear "Install Oracle Applications Release 12" welcome screen.
- Select "Installl Oracle Application Release 12.1.1, then click "Next" botton.
- Skip/Leave blank email id and support passward, if you have not then click "Next" botton.
- Select the "Create a new configuration" option, then click the "Next" button.
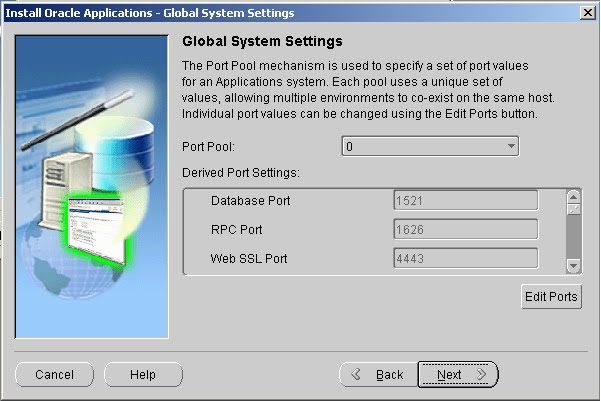
- Accept the default port pool by clicking the "Next" button.
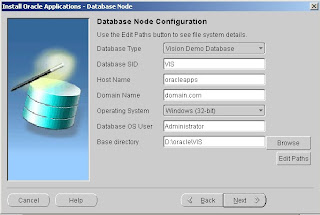
- Select the "Vision Demo Database" Enter Database SID, hostname, OS and base directory then click the "Next" button.
- Click the "Next" button on node information screen
- Select the "Suite Licensing" option, then click the "Next" button.
- Accept the default products by clicking the "Next" button.
- Select the appropriate country functionality, then click the "Next" button.
- Select the appropriate territory and characterset information, then click the "Next" button.
- Check the node configuration settings, then click the "Next" button.
- Accept the node information by clicking the "Next" button.
- Wait for the system check status to complete.
- Assuming all the system checks were completed successfully, click the "Next" button.
- Click the "Next" button on the installation review screen.
- Click the "Yes" button to start the installation.
- Wait while the installation takes place.
- Click the "Finish button to exit the Rapid Install Wizard.
URL: http://oacleapps:8000/OA_HTML/AppsLogin
Username: SYSADMIN
Password: SYSADMIN

If want to change default SYSADMIN password, just login to the eBusiness Suite homepage. Click on the "preferences". Here enter your old and password.
Friday, April 2, 2010
Upgrading to Oracle Database 11g
If there are no issues to resolve prior to the upgrade oracle 11g , Shut down the database and perform an offline backup before continuing with the upgrade process. Once you have a backup you can restore if needed, you are ready to proceed with the upgrade process. The process is detailed and script-based, so you should consult with the Oracle installation and upgrade documentation for your environment and version. You can choose one from following two upgrading methods.
Database Upgrade Assistant (DBUA)
Its recommended upgrade method is to use the Database Upgrade Assistant (DBUA), a GUI tool that performs all necessary prerequisite checks and operations before upgrading the specified instances. The DBUA can be started directly from the Oracle Universal Installer (OUI) or separately after the software installation is complete. In Microsoft Windows environments chose Database Upgrade Assistand from program list of typ "dbua" on comant prompt, installer welcome window will appear. Alternatively you may which to perform a manual upgrade which involves the following steps:
Manual Oracle 11g Database Upgrade
Execute script "$ORACLE_HOME/rdbms/admin/utlu111i.sql, it performs pre-update validation checks on an existing instance. The script checks a number of areas to make sure the instance is suitable for upgrade suchas Database version, initialization parameters, SYSAUX etc.
SQL> connect / as sysdba
SQL> spool /oradisk/11gdatabase_upgrade_checklist.txt
SQL> @utlu111i.sql
SQL> spool off
Resolved all issues indicated bebefore a manual upgrade is attempted. See 11gdatabase_upgrade_checklist.txt
1. Copy configuration files (init.ora, spfile.ora, password file) from their old location to the new Oracle software home directory.
2. Remove obsolete and deprecated initialization parameter from the configuration files identified in the Pre-Upgrade Information Tool. Update any initialization parameters to at least the minimum values specified in the Pre-Upgrade Information Tool report. Use full pathnames in the parameter files.
3. If you are upgrading a cluster database, set the CLUSTER_DATABASE initialization parameter to FALSE. After the upgrade, you must set this initialization parameter back to TRUE.
4. Shut down the instance.
5. If you are using Windows, stop the service associated with the instance and delete the
Oracle service at the command prompt. For Oracle 8.0, use the command
NET STOP OracleServiceName
ORADIM –DELETE –SID instance_name
Next, create the new Oracle Database 11g service using the ORADIM command, as shown here. The variables for this command are shown in the following table.
C:\> ORADIM -NEW -SID SID -INTPWD PASSWORD -MAXUSERS USERS -STARTMODE AUTO -PFILE ORACLE_HOME\DATABASE\INITSID.ORA
6. If your operating system is Unix or Linux, make sure the environment variables ORACLE_HOME and PATH point to the new release 11.1 directories, ORACLE_SID is set to the existing database’s SID, and the file /etc/oratab points to the new Oracle Database 11g home directory. In addition, any server or client-side scripts that set ORACLE_HOME must be changed to point to the new Oracle software home directory.
7. Log into the system as the owner of the Oracle Database 11g software.
8. Change your directory to the $ORACLE_HOME/rdbms/admin subdirectory under the Oracle software home directory.
9. Connect to SQL*Plus as a user with SYSDBA privileges.
10. Issue the startup upgrade command.
11. Use the spool command to log the results of the following steps.
12. Create a SYSAUX tablespace via the create tablespace command if you are upgrading from a release prior to 10.1. You should allocate SYSAUX between 500MB and 5GB of disk space, depending on the number of user objects. SYSAUX must be created with the following clauses: online, permanent, read write, extent management local, and segment space management auto. All those clauses except segment space management auto are the defaults. See the output from the Pre-Upgrade Information Tool for suggested sizing of the SYSAUX tablespace. Here’s an example:
create tablespace SYSAUX
datafile '/u01/oradata/db1/sysaux01.dbf' size 500m reuse
extent management local
segment space management auto online;
13. Run the script catupgrd.sql in the 11g environment. This script automatically determines which upgrade scripts must be run, runs them, and then shuts down the database.
14. Stop spooling (via spool off) and review the spool file for errors. Resolve any problems identified there. Restart the database at the SQL*Plus prompt using the startup command.
15. Run the utlu111s.sql file to upgrade Oracle components such as Oracle Text, Oracle Ultra Search, Oracle Application Express, and the Oracle Server itself. You run it as follows:
SQL> @utlu101s.sql
16. Oracle will then display the upgrade status of each component. The upgrade elements should all be listed with a status of “VALID.”
17. Run the catuppst.sql script, located in $ORACLE_HOME/rdbms/admin to perform upgrade steps that do not require the database to be in UPGRADE mode:
SQL> @rdbms/admin/catuppst.sql
18. Run the utlrp.sql script to recompile invalid packages:
SQL> @utlrp.sql
19. You can then verify that all packages and classes are valid by using the following SQL:
select count(*) from dba_invalid_objects;
select distinct object_name from dba_invalid_objects;
20. Shut down the database and perform an offline backup of the database; then restart the database. The upgrade is complete.
