If want to remove oracle database from Oracle RedHat Enterprize Linux, just follow following process for removing oracle database from RedHat 4.7
1. go into the base directory of orcale like /oradisk/app/oracle then delete all files.
2. Next, go into /usr/local/bin then delete all files
3. Next , go into /etc then delete oraInst.loc and oratab files.
4. Next, restart the system.
Tip: Use Emacs text editor if, some problems in .bash_profile or dbstart configuration file
Sunday, February 21, 2010
Saturday, February 20, 2010
Auto Startup and Shutdown Oracle Database on Linux
Follow the following steps for configuring Automating Database Startup and Shutdown on Linux
1. Once the instance is created, edit /etc/oratab file setting the restart flag for each instance to 'Y'.
ORCL:/oradisk/app/oracle/product/10.2.0:Y
2. Next, create a file /etc/init.d/dbstart as the root user, containing the following.
1. Once the instance is created, edit /etc/oratab file setting the restart flag for each instance to 'Y'.
ORCL:/oradisk/app/oracle/product/10.2.0:Y
2. Next, create a file /etc/init.d/dbstart as the root user, containing the following.
Installing Oracle Database on Linux
First of all install Oracle Enterprise Linux 4 operating system for installing oracle database on linux os just read my previous post Installing Oracle Enterprise Linux OS for Oracle Database
Configuring/Preparing Enterprise Linux OS for Oracle Database
Linux Operating system is installed successfully, now you need to configure it for installing oracle database. This section walks through the steps required to configure Oracle Enterprise Linux 4 OS for Oracle Database 10g Release 2.
Configuring/Preparing Enterprise Linux OS for Oracle Database
Linux Operating system is installed successfully, now you need to configure it for installing oracle database. This section walks through the steps required to configure Oracle Enterprise Linux 4 OS for Oracle Database 10g Release 2.
Thursday, February 11, 2010
Installing Linux for Oracle Database
.
In this tutorial, you learn how to install Oracle Database 10gR2 on Oracle Enterprise Linux 4 Following are the linux distributions certified for Oracle Database 10g Release 2:
Oracle Enterprise Linux 5 (OEL5)
Oracle Enterprise Linux 4 (OEL4)
Red Hat Enterprise Linux 5 (RHEL5)
Red Hat Enterprise Linux 4 (RHEL4)
Red Hat Enterprise Linux 3 (RHEL3)
Novell SUSE Linux Enterprise Server 10 (SLES10)
Novell SUSE Linux Enterprise Server 9 (SLES9)
Asianux 2.0
Asianux 1.0
This guide assumes a server with the following hardware:
Wednesday, February 3, 2010
Adding meta tags to blogger
Do you apperceive abacus meta tags is so important if you appetite to get added cartage from chase engines like google,yahoo,msn,etc,especially the meta description is the best important one.
If you don't apperceive what meta tags are,Meta tags are the tags which describes your armpit and tells the chase engines what your armpit is all about.Adding meta tags is an important agency in SEO.(Search Engine Optimisation).Meta tags allows chase engines to basis your web pages added accurately. In added words,Meta tags acquaint with the chase engines and tells added advice about your armpit and accomplish it basis accurately and accurately.
We accept to add two meta tags to the arch area of the template.One is the Meta description which describes your armpit and addition one is Meta Keywords which tells about your armpit keywords(what your armpit is all about)
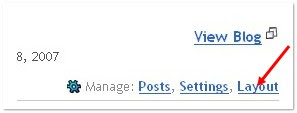 Step 1: Sign in to your blogger dashboard>click the 'layout' button[see the screenshot]
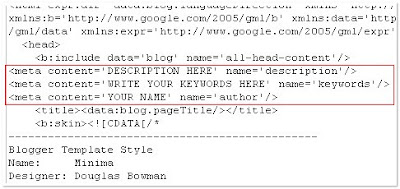
Step 3: Find following code line : Just find Ctr+F (b:include)
Add following lines after above mention code line, after updation it will be as following screenshot:
DESCRIPTION HERE:Write your blog description
KEYWORDS:Write the keywords of your blog
AUTHOR NAME:Write the author's name(Your name)
Step 4: Save template and test just previewing
That's it!You accept sucessfully added the metatags to your blogger. If you appetite to analysis whether you added the meta tags accurately or not,just blazon 'meta tags analyzer tool' in the google and you will acquisition so abounding sites which can analysis whether you accept added the tags accurately or not.
If you don't apperceive what meta tags are,Meta tags are the tags which describes your armpit and tells the chase engines what your armpit is all about.Adding meta tags is an important agency in SEO.(Search Engine Optimisation).Meta tags allows chase engines to basis your web pages added accurately. In added words,Meta tags acquaint with the chase engines and tells added advice about your armpit and accomplish it basis accurately and accurately.
We accept to add two meta tags to the arch area of the template.One is the Meta description which describes your armpit and addition one is Meta Keywords which tells about your armpit keywords(what your armpit is all about)
Step 1: Sign in to your blogger dashboard>click the 'layout' button[see the screenshot] Step 2: Click on the 'Edit html' tab
Step 3: Find following code line : Just find Ctr+F (b:include)
DESCRIPTION HERE:Write your blog description
KEYWORDS:Write the keywords of your blog
AUTHOR NAME:Write the author's name(Your name)
Step 4: Save template and test just previewing
That's it!You accept sucessfully added the metatags to your blogger. If you appetite to analysis whether you added the meta tags accurately or not,just blazon 'meta tags analyzer tool' in the google and you will acquisition so abounding sites which can analysis whether you accept added the tags accurately or not.
Monday, February 1, 2010
Bookmark Content to Social Networks (AddThis)
AddThis helps website publishers and bloggers spread their content across the web by making it easy for visitors to bookmark and share content to their favorite social destinations. AddThis is served 30 billion times a month to 500 million people in over 50 languages, and can be found on hundreds of thousands of websites. Learn more aboutAddThis features.
What can I share with AddThis?
AddThis can be used to share just about anything, including:
Websites, Blogs (Blogger, WordPress, TypePad, Tumblr), Email newsletters, MySpace profiles, Microsoft Office Live workspaces
Installing AddThis to your blog on Blogger is easy. This visual guide will walk you through the installation process.
First be sure to Get the Code for Blogger
Then, follow the steps below.
1. go at http://www.addthis.com/
2. Select your service (Blogger), button style and click on "Get Your Button"
Installing AddThis on Blogger (Sidebar)
Step 1: Click the Install to Sidebar button on AddThis.
Step 2: Click Add Widget, and you're done!
Installing AddThis on Blogger (Blog Post Button)
Step 1
Log into Blogger and select the blog you want to add AddThis to. Select Layout > Edit HTML. These controls look like tabs, and they're located at the top of the page
Step 2
Check the Expand Widget Templates checkbox. This checkbox is located in the top right corner of the page, above the code. By clicking the checkbox, the code in the field below will refresh.
Step 3
Copy and paste the AddThis code snippet into the template, right after the tag.
Subscribe to:
Posts (Atom)
